


How Can You DIY Ram Truck Exterior Modifications?
Last Updated: October 25, 2026
Quick Summary
DIY Ram truck exterior modifications include installing nerf bars, carbon fiber trim, LED lighting, and accessories that bolt on without major alterations. Most jobs require basic hand tools, a torque wrench, and verification that parts fit your specific model year, cab style, and bed length before ordering.
- Verify your truck's model year, cab style, and bed length before buying any parts to avoid fitment issues
- Essential tools include a socket set, torque wrench, jack stands, and plastic panel removal tools, never use metal screwdrivers on trim
- Nerf bar installation takes about an hour and requires lifting the truck safely with jack stands to access factory mounting points
- LED ditch lights and headlight swaps require a relay, dedicated switch, and fuse to avoid electrical problems and warranty complications
- Keep your factory parts and document your installation with photos so you can swap back to stock if needed for service
Table of Contents
- What You'll Need Before Starting DIY Ram Truck Exterior Modifications
- Step 1: Installing Ram 1500 Exterior Accessories
- Step 2: Adding Ram Truck Lighting Upgrades
- Understanding Ram Truck Accessory Fitment
- Common Mistakes to Avoid on DIY Ram 1500 Mods
- Protecting Your Paint and Warranty During Installation
- Ordering Your First Exterior Upgrade
- Frequently Asked Questions
What You'll Need Before Starting DIY Ram Truck Exterior Modifications
Before you grab a wrench and start bolting things to your Ram, let's talk about what actually matters. DIY Ram truck exterior modifications aren't complicated, but they do require the right tools, a clear head, and a solid understanding of what fits your specific truck. Skip this part and you'll end up with parts that don't line up, fasteners you can't tighten, or worse, a warranty headache.
Essential Tools and Safety Gear
You don't need a full shop to handle DIY Ram truck exterior modifications. Most jobs require basic hand tools you probably already own.
Here's what to have on hand:
- Socket set (metric and standard)
- Ratchet wrench set
- Screwdrivers (Phillips and flathead)
- Torque wrench (critical for getting fasteners right)
- Jack and jack stands
- Work gloves and safety glasses
- Flashlight or headlamp
- Panel removal tools (plastic pry bars, not metal)
A torque wrench is non-negotiable. Undertighten fasteners and parts fall off. Overtighten and you strip threads or crack plastic. Get it right the first time.
Safety gear matters too. Work gloves protect your hands from sharp edges. Safety glasses keep debris out of your eyes. If you're working under the truck, jack stands are absolutely mandatory, never trust a jack alone.
Checking Fitment and Compatibility
This is where most DIY mistakes happen. You order parts, they arrive, and suddenly nothing lines up. Your Ram 1500 isn't the same as your buddy's Ram 1500 if they're different model years or cab styles.
Before you buy anything, verify:
- Model year: 2019-2024 Ram 1500 is different from 2025+
- Cab style: Crew cab, quad cab, and regular cab all have different dimensions
- Bed length: 5.7-foot beds fit differently than 6.4-foot or 8-foot beds
- Generation: First-gen 1500s (2009-2018) are completely different from fifth-gen (2019+)
Check the product listing carefully. Reputable aftermarket brands like those available through Merrick Motorsports list exact fitment specs. If a product says "2019-2024 Ram 1500 Crew Cab," that's what it fits. Don't assume it works on your quad cab.
Step 1: Installing Ram 1500 Exterior Accessories
Exterior accessories are the foundation of any good build. We're talking nerf bars, running boards, trim pieces, and mirror caps. These bolt on without modifications and transform how your truck looks.
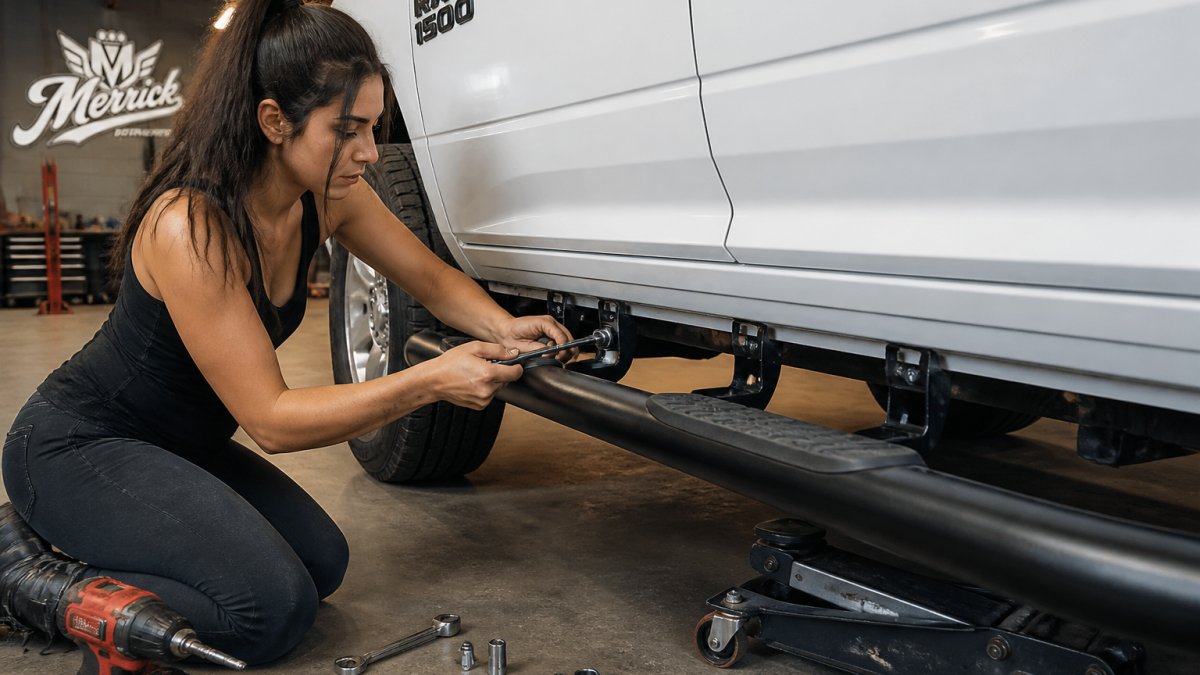
Nerf Bars and Running Boards
Nerf bars serve two purposes: they look aggressive and they make getting in and out of your truck easier. For a Ram 1500, you're looking at either a 3-inch or 4-inch step width. The wider option gives you more foot space, but both work well.
Installation takes about an hour. Here's the process:
- Lift the truck: Use a jack and jack stands to get safe working clearance
- Locate mounting points: Factory attachment points are already there on your rocker panels
- Install brackets: Bolt the mounting brackets to the frame using the factory holes
- Attach the step: Slide the nerf bar onto the brackets and tighten all fasteners
- Check alignment: Make sure the step sits level and doesn't rub on the tire
The RealTruck Traxio 4-inch nerf bars are a solid choice for Ram 1500s. They feature adjustable mounting brackets so you can dial in the perfect height whether your truck is stock or lifted. The anti-slip step pad keeps your feet planted even when it's wet or muddy. You can check out the nerf bars available at Merrick Motorsports to see what fits your specific truck.
Carbon Fiber Trim and Mirror Caps
Carbon fiber trim pieces are the easiest upgrade you can do. They bolt on in minutes and completely change the look of your truck's side profile. Mirror caps are the most popular choice because they're visible and they make a statement.
Installation is stupid simple:
- Clean the factory mirror cap: Use rubbing alcohol and let it dry completely
- Peel the backing: Remove the adhesive backing from the carbon fiber overlay
- Align and press: Center the overlay on your factory mirror cap and press down firmly
- Let it cure: Wait 24 hours before touching or washing your truck
The 2019+ Dodge Ram 1500 TRX carbon fiber mirror cap covers use 3M automotive-grade adhesive. They're 3D-molded to sit flush, so there's no gap between the overlay and your factory cap. You can grab the mirror caps from Merrick Motorsports if you want the real deal.

Step 2: Adding Ram Truck Lighting Upgrades
Lighting is the upgrade that makes your Ram look like it means business, and the one most likely to get you pulled over if you do it wrong. Ditch lights, A-pillar pods, and LED headlight swaps are all doable in a driveway, but there's a right way and a "why is my truck flashing at oncoming traffic" way. Let's do it right.
LED Ditch Lights and A-Pillar Mounts
Ditch lights are small LED pods mounted on your A-pillars or front bumper. They throw light to the sides for off-road and low-light work, and they look aggressive doing it. The key is mounting them to factory points so you don't drill into a perfectly good pillar.
Vehicle-specific A-pillar brackets for the 2019+ Ram 1500 (including Rebel and TRX variants) bolt to existing factory holes. No drilling, no guessing.
Here's the install flow:
- Disconnect the battery, negative terminal first. Cheap insurance against a surprise airbag or a blown fuse.
- Pop the A-pillar trim, use plastic panel tools, not a screwdriver. Work slowly; the clips are plastic and they remember.
- Bolt the bracket to the factory hole, use the supplied hardware and snug it down. Don't gorilla it.
- Mount the pod, aim it slightly outward and down so it lights the ditch, not the moon.
- Run the wiring, route power and ground through the pillar and into the engine bay, keeping clear of sharp edges and hot surfaces. Use split loom or grommets where wires pass through metal.
- Wire through a relay and switch, relay to the battery, switch to the cab. Fuse the power lead.
- Test before reassembly, confirm both pods light and the switch works before you snap the trim back.
LED Headlight and Taillight Swaps
LED headlight upgrades are more involved than ditch lights but worth it for visibility. Before you buy, check three things:
- Bulb type, H11, 9005, and similar vary by year and trim. Confirm yours before ordering.
- Housing compatibility, some newer Rams use projector or adaptive housings that don't play nice with drop-in LEDs.
- Canbus/error codes, some trucks throw a bulb-out warning with low-draw LEDs. A canbus-ready bulb or resistor fixes it.
The swap itself:
- Pop the hood and access the back of the housing, remove any plastic covers.
- Disconnect the factory bulb, twist counterclockwise and pull.
- Seat the new LED, twist clockwise until it locks. Make sure the emitter orientation matches the housing so the beam pattern stays correct.
- Test the pattern against a wall, you want a clean cutoff, not a scatter of light in oncoming drivers' eyes.
- Reinstall covers and trim.
Taillights follow the same logic, access from inside the bed or behind the housing, disconnect, swap, test.
Legal, Safety, and Warranty Reality Check
This is the part the product roundups skip. Lighting mods touch three areas you should understand before you start:
- Road-use rules, auxiliary and off-road lights are generally not legal for on-road use in most states. Many are sold "off-road use only." Keep them on a separate switch and use them off-road or on private property. Headlight color and brightness are also regulated, stick to white/amber and avoid tinted or colored bulbs for street use.
- Inspection, some states inspect lighting as part of safety or emissions checks. A non-compliant headlight or an always-on light bar can fail inspection. Check your state's rules before you commit.
- Warranty and electrical, tapping into factory wiring can complicate warranty coverage on electrical components. Using a relay, fuse, and dedicated switch keeps your install clean and reversible. Keep your factory bulbs and housings so you can swap back if needed.
Don't cheap out on headlights. You use them every time you drive, and a bad beam pattern is a safety issue, not just a style one. You can check out Ram-specific LED lighting and A-pillar mounts at Merrick Motorsports to find parts engineered for your truck's housing and wiring.
Understanding Ram Truck Accessory Fitment
Fitment is where DIY Ram truck exterior modifications go to die. You order a set of nerf bars, they show up, and the mounting holes are six inches off because your truck is a quad cab and the part was cut for a crew cab. Been there. Wore the T-shirt. Returned the bars.
This section is the fitment guide the accessory roundups skip. Read it before you click "add to cart."
RealTruck 19-26 Ram 1500 Quad Cab Traxio 4in Nerf Bars - Textured Black →
The Three Numbers That Decide Everything
Every exterior part on a Ram is keyed to three things. Get these right and 90% of fitment problems disappear:
- Generation and model year, the 2019+ fifth-gen 1500 is a different animal from the 2009-2018 fourth-gen. Mounting points, body lines, and bumper geometry all changed.
- Cab style, regular cab (two doors), quad cab (four doors, shorter rear doors), and crew cab (four doors, full rear doors) have different rocker panel lengths and different rear-door cutouts. A crew-cab running board will not bolt to a quad cab.
- Bed length, 5'7", 6'4", and 8' beds change tonneau cover, bed rail, and bed-rack fitment. The bed length is tied to cab style on most configurations, so verify both.
Generation-by-Generation Cheat Sheet
Here's the rough map most aftermarket brands use. Treat it as a starting point, not gospel, always confirm against the product listing.
| Generation | Years | What It Means for Exterior Mods |
|---|---|---|
| Fourth-gen 1500 | 2009-2018 | Plenty of parts, but many listings are 1500-only and won't cross to 2500/3500 |
| Fifth-gen 1500 | 2019-2024 | The sweet spot, deepest aftermarket catalog, most bracket options |
| Heavy Duty (2500/3500) | Varies by generation | Different frame, different bumper mounts, do not assume 1500 parts fit |
A common pattern: a part listed as "2019-2024 Ram 1500" fits the fifth-gen 1500 but not the 2500/3500 of the same years. The frames and bumper mounts are different.
Trim Level and Special Editions Matter Too
The TRX and Rebel trucks have unique front bumper and fender geometry. A-pillar light brackets cut for a standard 1500 often won't clear TRX fender flares or Rebel bumper contours without trimming. Check the listing for "TRX" or "Rebel" in the fitment notes, if it's not there, assume it doesn't fit.
The Fitment Workflow That Saves Your Weekend
Before you buy any exterior part, run this checklist:
- Write down your truck's specs, year, cab, bed, trim, and whether it's 1500 or Heavy Duty.
- Read the product's fitment notes line by line, not just the headline. Look for exclusions like "excludes TRX" or "crew cab only."
- Check for required drilling or trimming, some brackets reuse factory holes; others want you to drill. Know which before you commit.
- Confirm hardware is included, brackets, bolts, and spacers should be in the box. If not, factor in a trip to the hardware store.
- Look for a model-specific install video or PDF, a brand that publishes one usually has its fitment dialed in.
Measure, Don't Guess
If you're between sizes or the listing is vague, grab a tape measure. Measure your rocker panel length and the distance between factory mounting holes. Compare that to the dimensions in the product listing. It sounds like homework, but it's cheaper than return shipping.
When in doubt, ask before you order. A quick fitment question to the seller beats a box of parts you can't use. You can browse vehicle-specific Ram exterior parts at Merrick Motorsports and filter by your exact configuration.
Common Mistakes to Avoid on DIY Ram 1500 Mods
We've all been there. You're excited, you buy parts, and something goes sideways. Here are the mistakes that happen most often.
Ordering without verifying fitment. This is number one. You see a cool part, the price looks right, and you hit buy. Then it arrives and it doesn't fit your truck. Verify model year, cab style, and bed length before you order anything.
Over-tightening fasteners. Plastic trim cracks. Threads strip. Metal warps. Use a torque wrench and follow the manufacturer's specs. If you don't have a spec, use common sense: hand-tight plus a quarter turn for most bolt-on accessories.
Skipping the safety gear. You're working under a truck that weighs 5,000 pounds. Wear safety glasses. Use jack stands. Don't rush.
Mixing adhesive types. If you're using 3M automotive tape, don't use silicone sealant over it. Different adhesives don't play well together and you'll end up with parts that peel off.
Forgetting about warranty implications. Some modifications can void your factory warranty. Read the fine print before you start drilling holes or modifying electrical systems.
Installing parts in the wrong order. If you're adding a tonneau cover and nerf bars, install the nerf bars first. The tonneau cover can interfere with the mounting points.
Protecting Your Paint and Warranty During Installation
Your truck's paint is the first thing people see. Protect it during installation and your truck stays looking fresh.
Use panel removal tools instead of metal screwdrivers. Plastic pry bars won't gouge your paint or trim. They're cheap and worth every penny.
Tape off areas where you're working. Painter's tape protects against accidental scratches and keeps adhesive off surfaces you don't want it on.
For warranty protection, keep your factory parts. If you ever need to return your truck for service, you can swap back to stock components.
Document your installation. Take photos of the process. If something goes wrong, you have proof that you installed it correctly. Merrick Motorsports stands behind quality parts.
Ordering Your First Exterior Upgrade
You're ready. You know what fits your truck, you have the tools, and you understand the process. Now it's time to order.
Start with one upgrade, not five. Get your nerf bars installed and dialed in before you move to lighting or trim pieces. You'll learn the process, build confidence, and avoid overwhelm.
Merrick Motorsports ships from six locations across the country, so your parts arrive fast. Check the product listing for your exact model year and cab style. If you have questions about fitment, reach out before you order.
Take your time with installation. Rushing leads to mistakes. Most bolt-on accessories take 30 minutes to an hour. Set aside an afternoon, grab a cold drink, and enjoy the process.
Your Ram 1500 is about to look incredible.
Frequently Asked Questions
What are the easiest DIY Ram truck exterior modifications for beginners?
Nerf bars, mirror cap covers, and ditch light mounts are the most beginner-friendly modifications. Most install in under an hour with basic hand tools and no drilling. The RealTruck Traxio nerf bars use factory attachment points and require no permanent modifications. Carbon fiber mirror caps use 3M adhesive tape, so installation is literally peel-and-stick. Start with these before tackling more involved upgrades like full lighting swaps or suspension work.
How do I verify that an exterior accessory will fit my Ram 1500?
Check the product listing for your specific model year, generation, cab type (crew cab, quad cab, regular cab), and bed length (5.7ft, 6.5ft, 8ft). Most quality manufacturers like RealTruck and KC HiLiTES list exact compatibility. If you're between generations, verify the fitment range, for example, 2019-2024 Ram 1500 parts may not fit 2025+ models due to redesigns. When in doubt, contact the seller with your VIN to confirm before ordering.
Can I install aftermarket lights on my Ram truck myself?
Yes, if you're comfortable with basic electrical work. Ditch light mounts like the KC HiLiTES A-Pillar brackets bolt on in 30-45 minutes. Headlight and taillight swaps vary in difficulty, some plug directly into factory connectors, while others require wiring harnesses. Always disconnect the battery before starting any electrical work.
What tools do I really need for DIY Ram truck exterior modifications?
Most bolt-on accessories require only a socket set, wrenches, and a torque wrench for proper tightening. Keep a flashlight, jack stands, and a creeper handy for undercarriage work. For carbon fiber and adhesive-based parts, grab rubbing alcohol and a clean cloth to prep surfaces. A trim removal tool prevents scratching panels during installation. Don't cheap out on a torque wrench, over-tightening can strip threads or crack plastic trim.
